Page 45 - Chip Scale Review Sep Oct_2022-digital
P. 45
between -60°C and 100°C (Range 1) and
                                                                              0.02°C between 101°C and 230°C (Range
                                                                              2). The device’s uncertainty is, therefore,
                                                                              maximally 0.02°C. A measurement wafer,
                                                                              often consisting of up to 17 sensors, has
                                                                              a significantly higher uncertainty of
                                                                              approximately 0.05°C due to the sensor-
                                                                              to-sensor accuracy deviation. It is also
                                                                              necessary to factor in the absolute accuracy
                                                                              of 0.03°C (taken from the wafer specification
                                                                              sheet), which leaves you with a total device
                                                                              uncertainty of 0.058°C—almost three times
                                                                              more than the maximum uncertainty of the
                                                                              single sensor. To calculate the calibration
                                                                              reliability, the tool’s uncertainty is added to
                                                                              the method (repeatability tests) uncertainty.
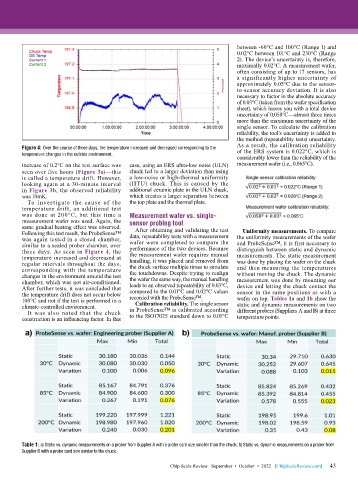
        Figure 4: Over the course of three days, the temperature increased and decreased corresponding to the   As a result, the calibration reliability
                                                                              of the ERS system is 0.022°C, which is
        temperature changes in the outside environment.
                                                                              considerably lower than the reliability of the
        increase of 0.2°C on the test surface was   case, using an ERS ultra-low noise (ULN)   measurement wafer (i.e., 0.065°C).
        seen over five hours (Figure 3a)—this   chuck led to a larger deviation than using
        is called a temperature drift. However,   a low-noise or high-thermal uniformity
        looking again at a 30-minute interval   (HTU) chuck. This is caused by the
        in Figure 3b, the observed reliability    additional ceramic plate in the ULN chuck,
        was 10mK.                          which creates a larger separation between
          To investigate the cause of the   the top plate and the thermal plate.
        temperature drift, an additional test
        was  done at 200°C, but this time a   Measurement wafer vs. single-
        measurement wafer was used. Again, the   sensor probing tool
        same gradual heating effect was observed.   After obtaining and validating the test
        Following this test result, the ProbeSense™   data, repeatability tests with a measurement   Uniformity measurements. To compare
        was again tested in a closed chamber,   wafer were completed to compare the   the uniformity measurements of the wafer
        similar to a sealed prober chamber, over   performance of the two devices. Because   and ProbeSense™, it is first necessary to
        three days. As seen in Figure 4, the   the measurement wafer requires manual   distinguish between static and dynamic
        temperature increased and decreased at   handling, it was placed and removed from   measurements. The static measurement
        regular intervals throughout the days,   the chuck surface multiple times to simulate   was done by placing the wafer on the chuck
        corresponding with the temperature   the touchdowns. Despite trying to realign   and then measuring the temperatures
        changes in the environment around the test   the wafer the same way, the manual handling   without moving the chuck. The dynamic
        chamber, which was not air-conditioned.   leads to an observed repeatability of 0.03°C,   measurement was done by mounting our
        After further tests, it was concluded that   compared to the 0.01°C and 0.02°C values   device and letting the chuck contact the
        the temperature drift does not occur below   recorded with the ProbeSense™.  sensor in the same positions as with a
        100°C and not if the test is performed in a   Calibration reliability. The single sensor   wafer on top. Tables 1a and 1b show the
        climate-controlled environment.    in ProbeSense™ is calibrated according   static and dynamic measurements on two
          It was also noted that the chuck                                    different probers (Suppliers A and B) at three
        construction is an influencing factor. In this   to the ISO17025 standard down to 0.01°C   temperature points.


        Table 1: a) Static vs. dynamic measurements on a prober from Supplier A with a probe card size smaller than the chuck; b) Static vs. dynamic measurements on a prober from
        Supplier B with a probe card size similar to the chuck.

                                                                                                             43
                                                         Chip Scale Review   September  •  October  •  2022   [ChipScaleReview.com]  43

