Page 40 - Chip Scale Review Sep Oct_2022-digital
P. 40
Addressing temperature accuracy and uniformity


        measurements in wafer probing


        By Klemens Reitinger, Bengt Haunerland, Sophia Oldeide  [ERS electronic GmbH]
        T        emperature has always been   thin wafer with multiple embedded sensors.   New calibration concept


                 an important parameter when
                                                                                To tackle the issues noted above and
                                           are notable advantages of this type of tool.
                 testing sensor devices, but the   Fast test times and instant uniformity data   lower the measurement uncertainty, there is
        trend is moving from simple, functional   Because of its multi-sensor design concept,   a need to eliminate the inherent weaknesses
        tests, to calibration at certain temperatures.   however, there will always be a sensor-to-  of the tools’ designs. ERS’s ProbeSense™
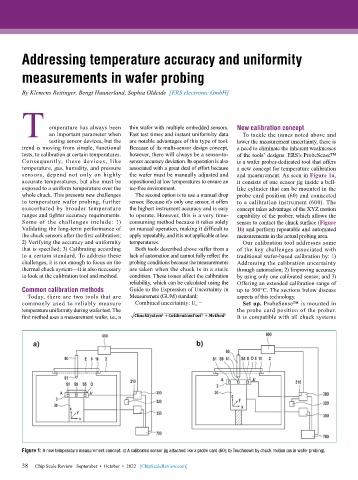
        Consequently,  these  devices,  like   sensor accuracy deviation. Its operation is also   is a wafer prober-dedicated tool that offers
        temperature, gas, humidity, and pressure   associated with a great deal of effort because   a new concept for temperature calibration
        sensors, depend not only on highly   the wafer must be manually adjusted and   and measurement. As seen in Figure 1a,
        accurate temperatures, but also must be   repositioned at low temperatures to ensure an    it consists of one sensor jig inside a bell-
        exposed to a uniform temperature over the   ice-free environment.     like cylinder that can be mounted in the
        whole chuck. This presents new challenges   The second option is to use a manual drop   probe card position (60) and connected
        to temperature wafer probing, further   sensor. Because it’s only one sensor, it offers   to a calibration instrument (600). The
        exacerbated by broader temperature   the highest instrument accuracy and is easy   concept takes advantage of the XYZ motion
        ranges and tighter accuracy requirements.   to operate. However, this is a very time-  capability of the prober, which allows the
        Some of the challenges include: 1)   consuming method because it relies solely   sensor to contact the chuck surface (Figure
        Validating the long-term performance of   on manual operation, making it difficult to   1b) and perform repeatable and automated
        the chuck sensors after the first calibration;   apply repeatably, and it is not applicable at low   measurements in the actual probing area.
        2) Verifying the accuracy and uniformity   temperatures.                Our calibration tool addresses some
        that is specified; 3) Calibrating according   Both tools described above suffer from a   of the key challenges associated with
        to a certain standard. To address these   lack of automation and cannot fully reflect the   traditional wafer-based calibration by: 1)
        challenges, it is not enough to focus on the   probing conditions because the measurements   Addressing the calibration uncertainty
        thermal chuck system—it is also necessary   are taken when the chuck is in a static   through automation; 2) Improving accuracy
        to look at the calibration tool and method.   condition. These issues affect the calibration   by using only one calibrated sensor; and 3)
                                           reliability, which can be calculated using the   Offering an extended calibration range of
        Common calibration methods         Guide to the Expression of Uncertainty in   up to 300°C. The sections below discuss
          Today, there are two tools that are   Measurement (GUM) standard:   aspects of this technology.
        commonly used to reliably measure    Combined uncertainty: U c  =       Set up. ProbeSense™ is mounted in
        temperature uniformity during wafer test. The                         the probe card position of the prober.
        first method uses a measurement wafer, i.e., a                        It is compatible with all chuck systems


        Figure 1: A new temperature measurement concept: a) A calibrated sensor jig attached like a probe card (60); b) Touchdown by chuck motion (as in wafer probing).

        38   Chip Scale Review   September  •  October  •  2022   [ChipScaleReview.com]
        38

