Page 42 - Chip Scale Review Sep Oct_2022-digital
P. 42
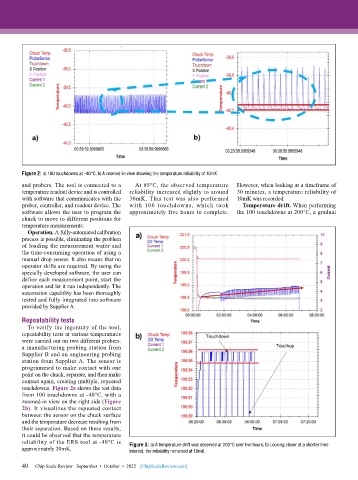
Figure 2: a) 100 touchdowns at -40°C; b) A zoomed-in view showing the temperature reliability of 10mK.
        and probers. The tool is connected to a   At 85°C, the observed temperature   However, when looking at a timeframe of
        temperature readout device and is controlled   reliability increased slightly to around   30 minutes, a temperature reliability of
        with software that communicates with the   30mK. This test was also performed   10mK was recorded.
        prober, controller, and readout device. The   with 100 touchdowns, which took   Temperature drift. When performing
        software allows the user to program the   approximately five hours to complete.   the 100 touchdowns at 200°C, a gradual
        chuck to move to different positions for
        temperature measurements.
          Operation. A fully-automated calibration
        process is possible, eliminating the problem
        of loading the measurement wafer and
        the time-consuming operation of using a
        manual drop sensor. It also means that no
        operator skills are required. By using the
        specially developed software, the user can
        define each measurement point, start the
        operation and let it run independently. The
        automation capability has been thoroughly
        tested and fully integrated into software
        provided by Supplier A.
        Repeatability tests
          To verify the ingenuity of the tool,
        repeatability tests at various temperatures
        were carried out on two different probers:
        a manufacturing probing station from
        Supplier B and an engineering probing
        station from Supplier A. The sensor is
        programmed to make contact with one
        point on the chuck, separate, and then make
        contact again, creating multiple, repeated
        touchdowns. Figure 2a shows the test data
        from 100 touchdowns at -40°C, with a
        zoomed-in view on the right side (Figure
        2b). It visualizes the repeated contact
        between the sensor on the chuck surface
        and the temperature decrease resulting from
        their separation. Based on these results,
        it could be observed that the temperature
        reliability of the ERS tool at -40°C is   Figure 3: a) A temperature drift was observed at 200°C over five hours; b) Looking closer at a shorter time
        approximately 20mK.                interval, the reliability remained at 10mK.

        40   Chip Scale Review   September  •  October  •  2022   [ChipScaleReview.com]
        40

