Page 31 - Chip Scale Review Sep Oct_2022-digital
P. 31
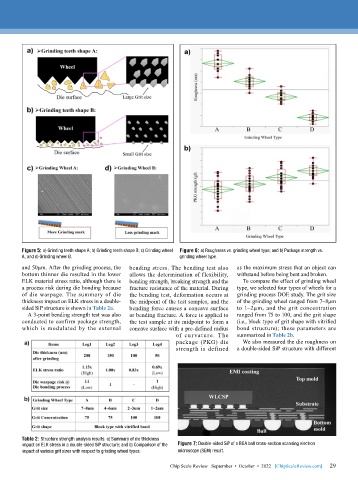
Figure 5: a) Grinding teeth shape A; b) Grinding teeth shape B; c) Grinding wheel   Figure 6: a) Roughness vs. grinding wheel type; and b) Package strength vs.
        A; and d) Grinding wheel B.                         grinding wheel type.
        and 50µm. After the grinding process, the   bending stress. The bending test also   as the maximum stress that an object can
        bottom thinner die resulted in the lower   allows the determination of flexibility,   withstand before being bent and broken.
        ELK material stress ratio, although there is   bending strength, breaking strength and the   To compare the effect of grinding wheel
        a process risk during die bonding because   fracture resistance of the material. During   type, we selected four types of wheels for a
        of die warpage. The summary of die   the bending test, deformation occurs at   grinding process DOE study. The grit size
        thickness impact on ELK stress in a double-  the midpoint of the test samples, and the   of the grinding wheel ranged from 7~8µm
        sided SiP structure is shown in Table 2a.  bending force causes a concave surface   to 1~2µm, and the grit concentration
          A 3-point bending strength test was also   or bending fracture. A force is applied to   ranged from 75 to 100, and the grit shape
        conducted to confirm package strength,   the test sample at its midpoint to form a   (i.e., block type of grit shape with vitrified
        which  is modulated  by  the external   concave surface with a pre-defined radius   bond structure); these parameters are
                                                           of cur vature. The   summarized in Table 2b.
                                                           package (PKG) die    We also measured the die roughness on
                                                           strength is defined   a double-sided SiP structure with different


        Table 2: Structure strength analysis results: a) Summary of die thickness
        impact on ELK stress in a double-sided SiP structure; and b) Comparison of the   Figure 7: Double-sided SiP of a BGA ball cross-section scanning electron
        impact of various grit sizes with respect to grinding wheel types.   microscope (SEM) result.

                                                                                                             29
                                                         Chip Scale Review   September  •  October  •  2022   [ChipScaleReview.com]  29

