Page 42 - ChipScale_Jul-Aug_2020-Digital
P. 42
possible accuracy. Accuracy is automatically
                                                                              tweaked by occasional recalibrations using
                                                                              glass scales at the edge of the bondable area.
                                                                              An electronic vibration cancellation system
                                                                              ensures that vibrations do not interfere with
                                                                              placement accuracy, and settling times are
                                                                              very short.
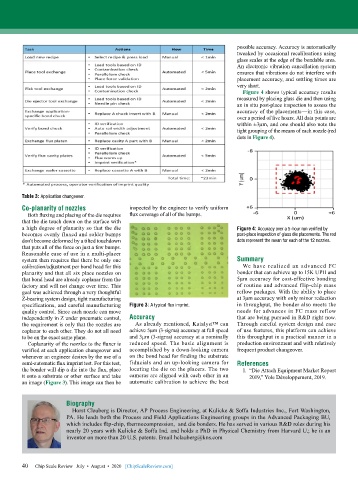
                                                                                Figure 4 shows typical accuracy results
                                                                              measured by placing glass die and then using
                                                                              an in situ post-place inspection to assess the
                                                                              accuracy of the placements—in this case,
                                                                              over a period of five hours. All data points are
                                                                              within ±3µm, and one should also note the
                                                                              tight grouping of the means of each nozzle (red
                                                                              dots in Figure 4).


        Table 3: Application changeover.

        Co-planarity of nozzles            inspected by the engineer to verify uniform
          Both fluxing and placing of the die requires   flux coverage of all of the bumps.
        that the die touch down on the surface with
        a high degree of planarity so that the die                            Figure 4: Accuracy over a 5-hour run verified by
        becomes evenly fluxed and solder bumps                                post-place inspection of glass die placements. The red
        don’t become deformed by a tilted touchdown                           dots represent the mean for each of the 12 nozzles.
        that puts all of the force on just a few bumps.
        Reasonable ease of use in a multi-placer
        system then requires that there be only one                           Summary
        calibration/adjustment per bond head for this                           We  have  realized  an  advanced  FC
        planarity and that all six place nozzles on                           bonder that can achieve up to 15K UPH and
        that bond head are already coplanar from the                          5μm accuracy for cost-effective bonding
        factory and will not change over time. This                           of routine and advanced flip-chip mass
        goal was achieved through a very thoughtful                           reflow packages. With the ability to place
        Z-bearing system design, tight manufacturing                          at 3μm accuracy with only minor reduction
        specifications, and careful manufacturing   Figure 3: A typical flux imprint.  in throughput, the bonder also meets the
        quality control. Since each nozzle can move                           needs for advances in FC mass reflow
        independently in Z under pneumatic control,   Accuracy                that are being pursued in R&D right now.
        the requirement is only that the nozzles are   As already mentioned, Katalyst™ can   Through careful system design and ease
        coplanar to each other. They do not all need   achieve 5µm (3-sigma) accuracy at full speed   of use features, this platform can achieve
        to be on the exact same plane.     and 3µm (3-sigma) accuracy at a nominally   this throughput in a practical manner in a
          Coplanarity of the nozzles to the fluxer is   reduced speed. The basic alignment is   production environment and with relatively
        verified at each application changeover and   accomplished by a down-looking camera   frequent product changeover.
        whenever an engineer desires by the use of a   on the bond head for finding the substrate
        semi-automatic flux imprint test. For this test,   fiducials and an up-looking camera for   References
        the bonder will dip a die into the flux, place   locating the die on the placers. The two   1.  “Die Attach Equipment Market Report
        it onto a substrate or other surface and take   cameras are aligned with each other in an   2019,” Yole Développement, 2019.
        an image (Figure 3). This image can then be   automatic calibration to achieve the best


                       Biography
                         Horst Clauberg is Director, AP Process Engineering, at Kulicke & Soffa Industries Inc., Fort Washington,
                       PA. He leads both the Process and Field Applications Engineering groups in the Advanced Packaging BU,
                       which includes flip-chip, thermocompression,  and die bonders. He has served in various R&D roles during his
                       nearly 20 years with Kulicke & Soffa Ind. and holds a PhD in Physical Chemistry from Harvard U.; he is an
                       inventor on more than 20 U.S. patents. Email hclauberg@kns.com


        40
        40   Chip Scale Review   July  •  August  •  2020   [ChipScaleReview.com]

